Showing posts with label tutorial. Show all posts
Showing posts with label tutorial. Show all posts
Tuesday, June 27, 2017
Tutorial CamStudio Software Perekam Aktivitas Layar Komputer

Camstudio adalah aplikasi yang berfungsi untuk merekam aktifitas yang ada pada monitor komputer. Aplikasi ini adalah berbasis opensource jadi bisa didownload di Internet. Aplikasi ini sangat berguna apabila kita ingin membuat tutorial dalam bentuk video, sehingga orang yang mempelajari tutorial tersebut akan lebih mudah mengerti. Video yang kita buat supaya dapat merekam suara dari luar computer maka harus dilengkapi oleh mikropon.
CamStudio dapat merekam semua aktivitas layar dan audio pada komputer Anda dan menciptakan standar industri AVI file video dan memanfaatkan built-in SWF Producer dapat mengubah format Avi menjadi kecil, yaitu format swf Streaming Flash videos.
VIDEO TUTORIAL CAM STUDIO
DOWNLOAD CAMSTUDIO 2.0 RAR
Bingung cara download dari Adf.ly klik disini

Monday, June 26, 2017
Tutorial Flashing Galaxy Mini Dengan ODIN
kerusakan, atau apapun bukan tanggung jawab ane,
Siapin bahanya gan:
1. HP Samsung Galaxy Mini
2. Kabel data bisa Gunakan kabel data Nokia dan BB
3. Seperangkat kompi, lepi lebih recomend karena antisipasi listrik mati
4. odin multi downloader
5. Firmware bisa kalian donwload di google sesuai selera
Proses:
Sebelum proses, matikan koneksi internet agan dan restart kompi/lepi agar minim kesalahan
1. Buka odin nya gan
2. Reboot Samsung Galaxy Mini ke download mode (tombol volume down+tombol tengah+tombol power, bersamaan sampai muncul tampilan downloading)


3. Hubungkan Samsung Galaxy Mini ke lepi pake kabel data(tetap dalam keadaan download mode)sampai di odin mendetect device kita dan muncul com port mapping yg warna kuning

4. Extract file firmware nya ke drive agan,
5. Kembali ke odin, pilih file untuk flashing yg kita download tadi dg aturan
setelah semua file dipilih klik start


6. Maka proses akan segera dimulai, Update ini hanya membutuhkan waktu kurang lebih 5 menit sampai muncul tanda “PASS” berwarna biru di ODIN.

dan selamat Hp Samsung Galaxy Mini Anda sudah Upgrade dan lebih fresh…
selamat mencoba dan semoga berhasil.
Sumber: Kaskus
dan selamat Hp Samsung Galaxy Mini Anda sudah Upgrade dan lebih fresh…
selamat mencoba dan semoga berhasil.
Sumber: Kaskus
Saturday, June 24, 2017
Total Jumping Server Tutorial
Get access to all the readable directories on the server and their possible database.
Steps to get access.
Go to your shell

Upload this zip file "Jumping.zip"
Download it from here
http://www.mediafire.com/?bjs5530pl3p80nz

After that just unzip our zip file by giving the following command
unzip jumping.zip

Once it done and unzip command is executed you will see like this

This show all the files included in our zip file
Now go and open our jumping folder. if you have uploaded it in public_html
then the link would be www.site.com/jumping and you would see the below image

Now open barc0de mini.php its an shell. once you open it. it look like this

Enter pass hackers

Now open jump.php it will take some time to load as it scans for all readable sites on server.
Once it done it will come up will all readable sites on server like this
Once it done it will come up will all readable sites on server like this

All the above are directly readable. Now will run scanner.php
it will read for config file in those dir once done it shows us like this

Now lets take one of them and put it in our barc0de mini.php and see if it shows us the database

And boom we have the access to its database config

i have included two more files sql.php & domain.php. this will help you to get website name and get in to database..cracker.php tries to crack ftp+ cpanel...
Updated barc0de.php
This shell is the newer version of barc0de mini.php
it is all in one shell. it has jump, scanner, cracker, and checker included in one shell

Download it from here barc0de.php
Thursday, June 22, 2017
Tutorial meletakkan Random Post Button Dalam Blog
Tutorial Letak Random Post Button Dalam Blog

Tutorial untuk memasang random post button ke dalam blog adalah seperti berikut.
1. Login akaun blogger > dashboard > layout

2. Kemudian add a gadget > HTML/javascript

3. Di dalam ruangan HTML/javascrip, copy dan paste salah satu kod di bawah. Terdapat dua jenis kod, satu untuk berada di sidebar, satu untuk statik. Anda boleh cuba mana-mana satu yang dirasakan sesuai.
3(a) Kode untuk random post button berada di sidebar
<style> #abt-random{position:relative;color:rgba(255,255,255,1);text-decoration:none;background-color:rgba(219,87,5,1);font-family:Yanone Kaffeesatz;font-weight:700;font-size:20px;display:block;-webkit-border-radius:8px;-moz-border-radius:8px;border-radius:8px;-webkit-box-shadow:0 9px 0 rgba(219,31,5,1), 0 9px 25px rgba(0,0,0,.7);-moz-box-shadow:0 9px 0 rgba(219,31,5,1), 0 9px 25px rgba(0,0,0,.7);box-shadow:0 9px 0 rgba(219,31,5,1), 0 9px 25px rgba(0,0,0,.7);margin-bottom:10px;margin-top:10px;width:160px;text-align:center;-webkit-transition:all .1s ease;-moz-transition:all .1s ease;-ms-transition:all .1s ease;-o-transition:all .1s ease;transition:all .1s ease;padding:4px} #abt-random:active{-webkit-box-shadow:0 3px 0 rgba(219,31,5,1), 0 3px 6px rgba(0,0,0,.9);-moz-box-shadow:0 3px 0 rgba(219,31,5,1), 0 3px 6px rgba(0,0,0,.9);box-shadow:0 3px 0 rgba(219,31,5,1), 0 3px 6px rgba(0,0,0,.9);position:relative;top:6px} #abt-random a{color: #fff;} </style> <center><div id="abt-random"></div></center> <script type="text/javascript"> function showLucky(root){ var feed = root.feed; var entries = feed.entry || []; var entry = feed.entry[0]; for (var j = 0; j < entry.link.length; ++j){if (entry.link[j].rel == alternate){window.location = entry.link[j].href;}}} function fetchLuck(luck){ script = document.createElement(script); script.src = /feeds/posts/summary?start-index=+luck+&max-results=1&alt=json-in-script&callback=showLucky; script.type = text/javascript; document.getElementsByTagName(head)[0].appendChild(script); } function feelingLucky(root){ var feed = root.feed; var total = parseInt(feed.openSearch$totalResults.$t,10); var luckyNumber = Math.floor(Math.random()*total);luckyNumber++; a = document.createElement(a); a.href = #random; a.rel = luckyNumber; a.onclick = function(){fetchLuck(this.rel);}; a.innerHTML = Random Post; document.getElementById(abt-random).appendChild(a); } </script><script src="/feeds/posts/summary?max-results=0&alt=json-in-script&callback=feelingLucky"> </script>ATAU
3(b) - Kode untuk random post button statik di sebelah kanan-bawah blog
<div style=display:scroll; position:fixed; bottom:5px; right:5px;> <style> #abt-random{position:relative;color:rgba(255,255,255,1);text-decoration:none;background-color:rgba(219,87,5,1);font-family:Yanone Kaffeesatz;font-weight:700;font-size:20px;display:block;-webkit-border-radius:8px;-moz-border-radius:8px;border-radius:8px;-webkit-box-shadow:0 9px 0 rgba(219,31,5,1), 0 9px 25px rgba(0,0,0,.7);-moz-box-shadow:0 9px 0 rgba(219,31,5,1), 0 9px 25px rgba(0,0,0,.7);box-shadow:0 9px 0 rgba(219,31,5,1), 0 9px 25px rgba(0,0,0,.7);margin-bottom:10px;margin-top:10px;width:160px;text-align:center;-webkit-transition:all .1s ease;-moz-transition:all .1s ease;-ms-transition:all .1s ease;-o-transition:all .1s ease;transition:all .1s ease;padding:4px} #abt-random:active{-webkit-box-shadow:0 3px 0 rgba(219,31,5,1), 0 3px 6px rgba(0,0,0,.9);-moz-box-shadow:0 3px 0 rgba(219,31,5,1), 0 3px 6px rgba(0,0,0,.9);box-shadow:0 3px 0 rgba(219,31,5,1), 0 3px 6px rgba(0,0,0,.9);position:relative;top:6px} #abt-random a{color: #fff;} </style> <center><div id="abt-random"></div></center> <script type="text/javascript"> function showLucky(root){ var feed = root.feed; var entries = feed.entry || []; var entry = feed.entry[0]; for (var j = 0; j < entry.link.length; ++j){if (entry.link[j].rel == alternate){window.location = entry.link[j].href;}}} function fetchLuck(luck){ script = document.createElement(script); script.src = /feeds/posts/summary?start-index=+luck+&max-results=1&alt=json-in-script&callback=showLucky; script.type = text/javascript; document.getElementsByTagName(head)[0].appendChild(script); } function feelingLucky(root){ var feed = root.feed; var total = parseInt(feed.openSearch$totalResults.$t,10); var luckyNumber = Math.floor(Math.random()*total);luckyNumber++; a = document.createElement(a); a.href = #random; a.rel = luckyNumber; a.onclick = function(){fetchLuck(this.rel);}; a.innerHTML = Random Post; document.getElementById(abt-random).appendChild(a); } </script><script src="/feeds/posts/summary?max-results=0&alt=json-in-script&callback=feelingLucky"> </script> </div>4. Save dan lihat hasilnya.:)
Tuesday, June 13, 2017
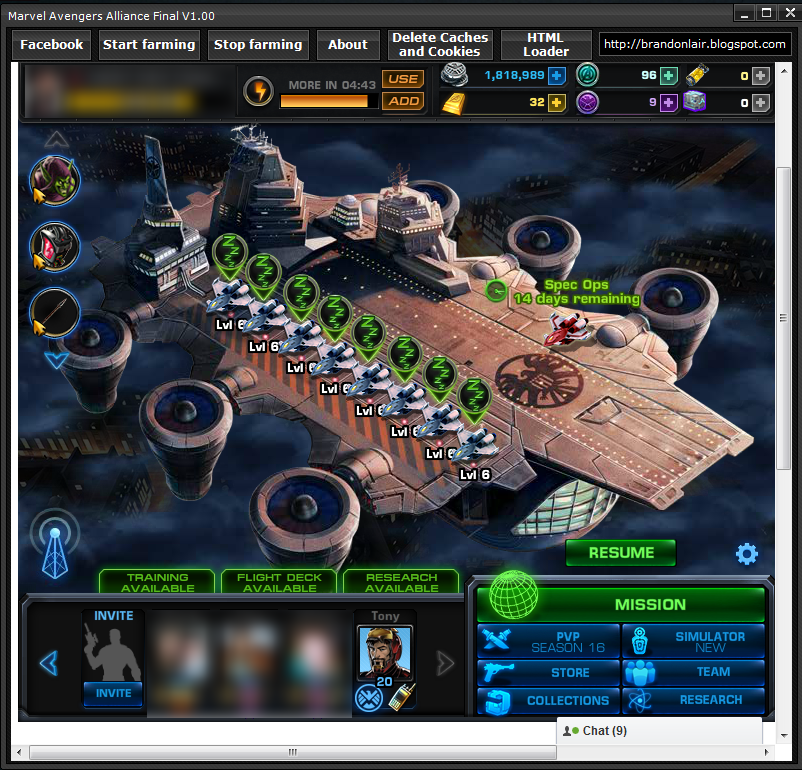
TOUGH TO USE Marvel Avengers Alliance Bot Final V1 00 Bot source with TEXT Tutorial!

I am back with an update on Marvel Avengers Alliance program which was released few months back. In few weeks back, i have made a lot of changes on the program that i completely rewrite the code in C#, previously VB.NET. I faced so many challenges a long the way to be able to reach this version. This program still uses Awesomium engine due to its extraordinary speed but sadly it doesnt work well with its HTML loader function. Get ready for a wall of texts!
I think this would be my final release for this bot. I stopped playing MAA because of the f*#king patch that patched the AI codes.
 |
| Subject to change - Awesomium Engine |
 |
| Subject to change |
Things that need to change:
- Delay time(Increase the number)
- Number of loops(Maybe)
- Use Window(Currently set to internetexplorer_server)
I recommend you to use my trainer which is NOT included in this download(separate download) but you can also use other similar trainer which can attach to my program(Konghacks cheat). To attach the trainer to the program, select "awesomium_process".
Its quite easy to make your own bot using vTask Studio without the use of image recognition, because the pixels in your computer might change slightly(you never know) and you dont need any computer languages to be able to make your own bot with vTask Studio.
To see all the changes i have made to the program, visit this link.
Text Tutorial:
- Edit the .vxm part to your liking
- Compile the .vxm by going to "Tools" then "Compile Program" and name the output file as "farm.exe" and "Tick" Single Instance or it will cause an error.
- Store the farm.exe inside the scripts folder
- Change your display text by "Right click > Personalise > Display(Left Corner) > Select 100% > Apply"
- Open the program by running bot.exe and click Facebook.
- Login and once the flight deck has load adjust the game so the edges of the game is touching the top of the program.

Adjust the game to touch the top of the program - Abort any mission that you are doing now. Setup your agent equipment(Bot will only use 1st skill so put the strongest no cooldown weapon on the 1st slot)and team. My recommended team for farming is Brown and Tan Wolverine and Swashbuckler Nightcrawler and of course an agent using Warbringer Axe.
- Once that is done, click "Start Farming"
- To stop farming, either close the program or click "Stop Farming"
- Enjoy the Command Points that youve farmed.
DOWNLOADS
Requirement
.NET Framework 4.0
Winrar
Adf.ly
Marvel Avengers Alliance Bot Final V1.00 x86 + Source
vTask Studio v7.84 - SND
Adfoc.us
Marvel Avengers Alliance Bot Final V1.00 x86 + Source
vTask Studio v7.84 - SND
VirusScan
x86
Edit:
Edit2: Ok! Fixed the references. The program will now work as intended.
Edit3: As requested, i am currently making a video tutorial.
Edit4: Video tutorial has been uploaded and posted on the post.
Sunday, June 4, 2017
Tutorial Copy File lebih dari 2GB ke Flashdisk
Biasanya Kita Bingung Kenapa kita tidak bisa mengCopy File yang ukurannya lebih besar dari 2GB ke FlashDisk , padahal
ukuran FlashDisk Kita lebih dari 2GB :v
ukuran FlashDisk Kita lebih dari 2GB :v
Kenapa?? karena File System pada FlasDisk Umumnya Fat/Fat32,..
Fat/Fat32 hanya bisa melakukan Transfer data Maksimal sebesar 2GB..
Nah, Bagaimana agar kita bisa mengCopy File dengan Size up to 2GB ke FlashDisk?
Caranya yaitu dengan mengubah File System dari Fat/Fat32 menjadi NTFS..
Kenapa NTFS ??? apa Keunggulannya???
1). Kecepatan copast/move data, file, dan apapun itu dari/ke flashdisk akan lebih cepat
2). Dapat melakukan copast/move file berukuran lebih besar dari 4GB sekaligus dari/ke flashdisk
3). Tersedia fitur enkripsi data (security) dan Quota
4). Keunggulan ntfs dibandingkan fat, error drive is full padahal flashdisk masih kosong.
Cara MengCopy File Yang ukurannya lebih dari 2GB ke FD :
1. Siapkan Flashdisk 4GB atau Lebih
2. Format FlashDisk Menjadi NTFS

3. Done :D
Semoga Bermanfaat^_^)
sumber
Thursday, May 25, 2017
TUTORIAL ON STEAM FOR NEWBIE OR PIRATE USERS
TUTORIAL STEAM FOR NEWBIE/ PIRATE USER xD
Disini Saya akan menjelaskan Apa Itu STEAM! Cara Install Steam ! Cara Membeli atau Bermain Game di Steam dan Menginstall Game Steam.
A; Apa Bedanya Game Original Dengan Bajakan?
B: Kalau Bedanya Sih udah Jelas Banget, Original Menang jauh dibanding bajakan, Intinya Bajakan gk bisa Online/multiplayer tanpa yg buat cracknya gk bikin server sendiri, Sedangkan Original langsung dari developer gamenya dan Update/Patch Otomatis.


A : Apa Itu STEAM??
B: Steam adalah distributor permainan digital milik Valve dengan cara membeli via pembayaran daring dengan media unduhan. Dengan adanya Steam, diupayakan agar pembajakan game yang marak bisa ditekan. Cara kerjanya dengan mengunduh perangkat lunak Steam, dengan begitu dapat dicek dan langsung membeli permainan yang ada.
A. Cara Installnya Bagaimana?
B: Pertama Kunjungi http://Store.steampowered.com/about/ . Lalu Klik Install STEAM Now.
Kalau Sudah selesai mendownload, Install Steam seperti menginstall Software lainnya.
A: Cara Membuat Akun Steam Gimana?
B: Masuk Ke https://store.steampowered.com/join/? . Daftarnya Sama Seperti Daftar akun pada Umumnya, Untuk Steam Account Name < Itu tidak bisa diganti, jadi harus Bener" dipikirkan matang" saat membuatnya, karena digunakan Pada Saat Login Steam. Dan Pertanyaan Keamanan Untuk Jaga" kalau Lupa Password atau yg lainnya. Setelah Selesai, CHECK Email Kalian Untuk Konfirmasi.
A. Cara Beli Game di Steam gimana?
B. Untuk Membeli game di steam kita bisa menggunakan Paypal, Kartu kredit, Visa Card. Jika Itu Susah karena lu ga punya Kartu kredit, bisa beli Ke Seller" yang reccomended, Dengan Pembayaran Via Bank Dan tentunya yang agak gampang tapi 20% lebih mahal, Via PULSA.
Tempat Jual Beli Games Serta Trading : Komunitas Gamers Indonesia (SHOP) 3,6K Anggota
Untuk Diskusi Tentang Games Original : Komunitas Gamers Indonesia < 33K Anggota
A. Cara Install Game yang Gratis / Free di Steam gimana??
B. Pertama Login Dulu Ke Steam

Nah, Disana Kita Masukkan Steam Account Name yang kita Buat, Untuk Account Name Itu tidak bisa diubah namanya.
Kalau Sudah Login Maka Tampilan Steam akan Seperti Ini

Nah, Untuk yang saya beri tanda panah itu, Klik Store maka Tampilannya Akan Seperti ini,

Nah Dibawah ini Tampilan Store, Dan langsung aja arahin Cursor Mouse Ke Games, Dan Pilih Free To Play Seperti yg ditunjuk Anak Panah.

Setelah Itu Tampilannya akan Seperti ini jika di scroll Kebawah, Disini lgsung Klik Yang Most Popular atau Games Free Yang paling banyak/ sering dimainkan.

Dan Diatas beberapa Games Free To Play yang Sering Dimainkan/paling banyak dimainkan, Untuk No 1 Tak heran jika Dota 2 Adalah Games No 1 Di Steam yang paling banyak/sering dimainkan.
Jika Ingin Menginstallnya, Klik di Area Kotak Dota 2 entah itu gambar atau tulsian Free To Play, Jika Sudah Di Klik Maka Tampilannya Seperti Ini

Itu Diatas Adalah Tampilan Jika Sudah Klik Dota 2 tadi, Dan Jika Discroll Kebawah Maka Tampilannya Seperti ini

Nah, klo sudah di scroll akan kayak gitu gambarnya, Kalau Mau Mainin, Klik Play Game, Kalo sudah, Gambarnya seperti dibawah ini

Nah, Diatas adalah Tampilan Ketika Mau mendownload game di steam, Untuk Tanda Panah yg atas, Itu Menunjukan Total Size Games Tersebut, Bukan Size downloadnya tapi TOTAL SIZE. Sedangkan Anak Panah dibawahnya itu Tempat Kosong di Harddisk kita, Setelah Itu Klik NEXT, Next Dan Next, setelah itu Tampilannya Seperti Dibawah.

Untuk Garis Hitam Itu Adalah Kecepatan / Speed Download Kita
Untuk Garis Biru itu Adalah Kecepatan Tertinggi Saat mendownload game tersebut,
Untuk Yang Merah Adalah Total Size Yang sudah diDownload. Untuk Resume Pause Bisa Dilihat di Pojok Kanan Atas, Nanti Ada Tulisan Pause kalau kita sedang mendownload dan Resume Ketika kita Stop/ Pause saat mendownload.

Kalau Sudah Selesai Mendownload Klik LIBRARY dan Cari Game Dota 2, Lalu Klik Tulisan Play, sementara Diatas Adalah INSTALL karena belom selesai download. Kalau Sudah Selesai Tulisannya Berudah Menjadi PLAY GAME.
Sekian Tentang Tutorial Kali ini, Tunggu Tutorial Steam Lainnya.
REKOMENDASI GAMES STEAM FREE TO PLAY :
- DOTA 2
- WARFRAME
- TEAM FORTRESS 2
- TOM CLANCY GHOST PANTHOM
- LOADOUT
- UNTURNED
- NOSGOTCH
- WARTHUNDER
- ROBOCRAFT
- HEROES & GENERALS
Jika ada yang mau Nambahin Monggo Di Komentar :D
Thursday, May 18, 2017
Tutorial Edit Foto Background Blur dengan Photoshop

Hey hey hey! Hari ini aku bakal share sedikit ilmu hitma ke kalian, tentang bagaimana cara menyantet meng-edit foto agar kelihatan seperti kamera DSLR. Sering iri gak ketika lihat foto temen yang hasilnya keren background-nya bisa Blur karena dia punya kamera DSLR? Udah, gak usah iri, syukuri aja apa yang ada bisa selfie aja udah alhamdulillah hehehe.
Oke-oke, buat kalian yang masih belum puas dengan hasil jepretan sendiri, mari kita edit bareng-bareng, agar hasilnya gak kalah keren ama kamera DSLR Langsung aja ke TKP
- Buka Photoshop (versi apaaja), tekan Ctrl-O kemudian cari foto mana yang ingin dieksekusi, selanjutnya gunakan Pen Tool (P) perhatikan setting-an yang ada.

- Mulailah menyeleksi pada tepi-tepi objek

- Jika sudah terseleksi semua selanjutnya klik kanan pilih Make Slection, lalu pada Feather Radius beri angka 1 dan klik Ok

- Setelah objek terseleksi, tekan tombol Ctrl+J untuk menduplikat objek

- Maka muncul layer baru (Layer 1) diatas layer Background, terus klik layer Background, lalu klik Filter–Blur–Gaussian Blur

- Pada kotak dialog Gaussian Blur atur Radius-nya sesuai kebutuhan lalu klik Ok

- Langkah terakhir tinggal di-save dan siap untuk di-upload di Instagram
Tutorial Edit Foto Efek Vintage di Photohop

Subscribe to:
Posts (Atom)